I showed you how we 3D print our custom weapons for testing and scaling purposes in the previous article. The guns and guns we sell are injection molded. However, 3D printing them is the initial step before an aluminum mold is made.
You can read our article, “How to 3D print custom 1/12 guns and weapons for your GI JOE Classified figures.” It describes our process of 3D printing the weapons we make before selling them on the eBay platform.
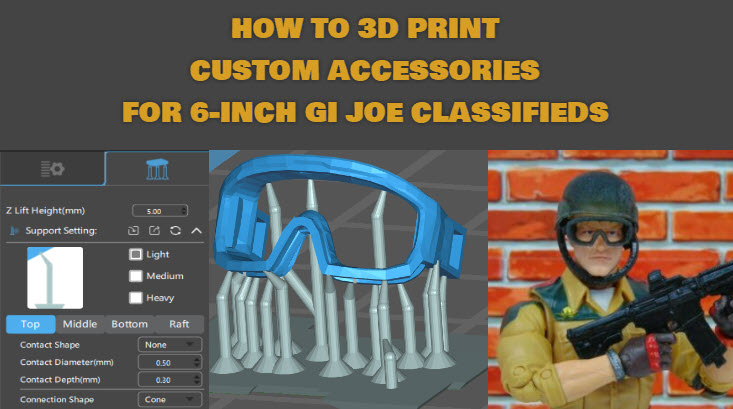
For this week’s how-to guide, I will show you how we 3D print accessories with complex geometries. Unlike the Custom Tactical Combat SMG in the previous article, it cannot be “split” in half so quickly.
Let’s begin.
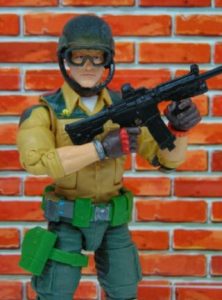
The accessory for today’s tutorial is our Custom 1:12 scale Modern Military Goggles. You can find it in our eBay store here.
As mentioned in the previous article, since this is not a tutorial on using a 3D printer, I expect you already possess beyond basic knowledge and experience in 3D printing. I also assume you own a 3D printer and have your own slicing software and 3D editing software.
Lastly, also stated in the previous article, we will refer to the Anycubic Photon (3D printer), and Chitubox (Slicing software) throughout this article for the sake of simplicity:
It is not a requirement to exactly have everything mentioned above. Regardless of your printer, software, and model, you can still follow along.
OK, let’s get started. The first step is to download the 3D model.
STEP #1 – Download the 3D model
Here, you can download the STL file for the Custom 1/12 Modern Military Goggles.
STEP #2 – Import 3D model into CHITUBOX
Suppose you followed the previous tutorial (“How to 3D print custom 1/12 guns and weapons for your GI JOE Classified figures“). In that case, you may be wondering why you’re about to import the Goggles directly into CHITUBOX.
You may recall loading the object into TINKERCAD first. Then made some edits and adjustments and finally sent it to CHITUBOX for slicing.
The 3D model this time around doesn’t need any editing in TINKERCAD (thanks to our 3D Designer). Fortunately, we can save some time, load it directly into our slicing software, and make slight adjustments before printing.
Let’s do that now.
Open CHITUBOX. Once the application loads, click on “Open File” in the upper-left corner.
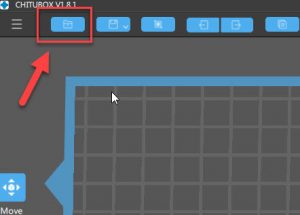
Navigate to the location where you saved the STL file for the Goggles in STEP #1. Then, click “Open.”
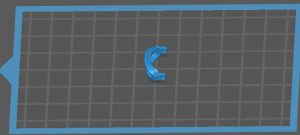
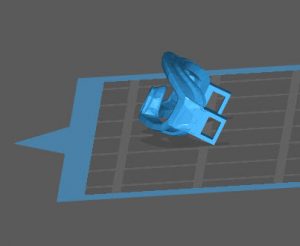
The 3D model of the Modern Military Goggles should load centered on the CHITUBOX print bed. When looking from the TOP VIEW, it should look something similar to this:
Excellent!
Next, we need to rotate the object and add support for printing.
But before we do that, let’s go over print supports for a minute.
PRINT SUPPORTS
As you may already know, 3D printers work by printing “layers” of plastic to create an object. I put layers in quotes because I want to express the importance of understanding this.
Since it prints one layer at a time and stacks plastic on top of the previously created layer, your 3D model needs to have a strong foundation.
Ideally, we would want the model’s base to be flat and be the largest surface area. Take a look at the sample 3D object of the pyramid here.
A pyramid is a perfect example of what I was describing above. It has a great foundation by design. It has a larger surface area on the bottom, and it is flat. Also, notice its upper portion. The 3D printer prints each layer, so the bottom layers can easily support the top because of its extensive base.
Similar to how houses are built, the foundation is created first. Its frames, walls, and roof are “added” on top of the foundation (base). Having a solid foundation is key to successfully building a house that will not collapse over time.
If we were to print the pyramid upside down, however, the printer would have difficulty printing the object. It may be close to impossible to get a successful print at all.
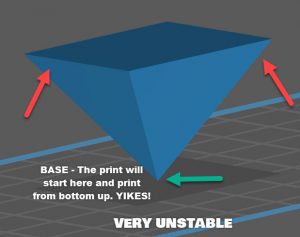
Since we are using the top of the pyramid as its foundation (base), which has a much smaller surface area, there’s a high chance that the object will not “stick” to the print bed when printing.
Also, the print will become very unstable. Each successive layer after the bottom layer will be more extensive in size. Referring to our house example again, this is like building a house, but starting with the roof first. Then, use the roof’s top “pointy” part as the foundation. YIKES!
You can already guess the outcome of this. It won’t be a pretty sight, and I don’t think anyone will hire a construction company that designs houses like that.
But let’s say we have to print this pyramid upside down for whatever reason. Maybe it’s because we want to preserve the bottom surface as much as possible. So, knowing that we can’t simply print starting from its “roof” but still need a strong base at the bottom, how would we do that?
Print supports can help you get the job done. It allows for more flexibility because we can practically create a foundation on demand! By using supports, you can print your object in a particular orientation that you wouldn’t be able to do so normally.
Let me show you what I mean with an example.
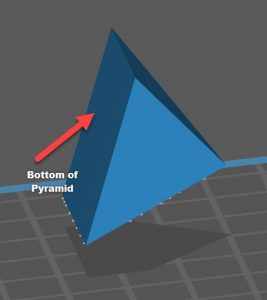
In the image above, you can see that the pyramid is now tilted on its side. Remember that the bottom surface is precious, and we want to protect it at all costs.
Typically, you wouldn’t be able to print the object this way either. Similar to printing the pyramid upside down, there isn’t much surface area at the bottom for a strong foundation.
Therefore, we need to add support to the object to have a foundation to support itself during the print.
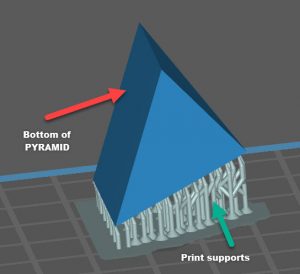
Take a look at the pyramid now, with the supports added.
See what I mean?
With the supports added, the pyramid should be able to print regardless that it is on its side. The support will act like the foundation mentioned above. And because of it, the overhangs will have something to support them as it prints each layer.
OK, that’s enough lecture on print supports. You get the idea.
Let’s get back to our Custom Military Goggles and get them printed.
STEP #3 – Add print supports
Before we can add supports, let’s rotate the object first. I like to place print supports on the least visible part of the model. Sometimes, it can leave “marks” and rough spots on the surface when you break them off.
So, we will rotate it like this in Chitubox (-30 deg. slant on X-Axis) for the Custom Military Goggles.
In Chitubox, click on the “Rotate” button.
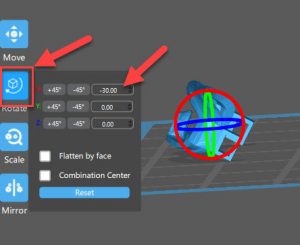
Once the Rotate window pops up, enter -30 (negative) inside the X-AXIS textbox. This will give the goggles a slant on their X-AXIS.
In the upper-right corner of Chitubox, click on the “Supports” tab. This will raise the model off the print bed and prepare it for support placement.
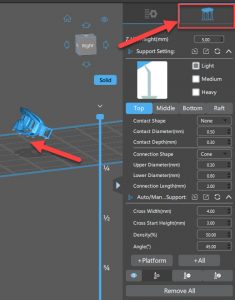
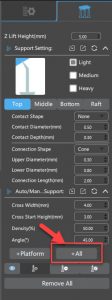
Don’t worry about the values presented inside the “Supports” menu. It looks intimidating, but you can just leave them the way they are by default, or copy the values we use, as shown in the image below.
Print support set-up and figuring out the values that will work for each print is beyond this guide’s scope. I suggest you search on Google or Youtube for more information. Also, try different combinations and see for yourself which ones work best.
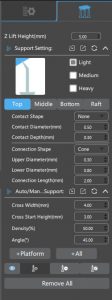
For us in the MAD shop, the following support settings in Chitubox work for most of our prints. Feel free to use them and see if they also work for you.
- Z lift height (mm) – 5.00
- Support Setting: – Light
- Shape – NONE
- Diameter (mm) – 0.50
- Depth (mm) – 0.30
- Connection Shape – CONE
- Upper Diameter (mm) – 0.30
- Lower Diameter (mm) – 0.80
- Connection Length (mm) – 2.00
- Cross Width (mm) – 4.00
- Cross Start Height (mm) – 3.00
- Density (%) – 50.00
- Angle (deg) – 45.00
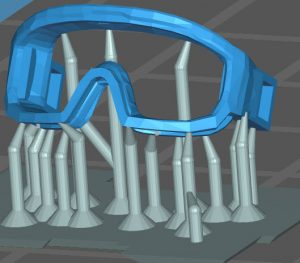
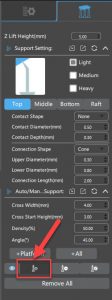
Once you’re comfortable with the print support configurations, click on the “+ All” button in the lower right corner.
Chitubox will automatically create print supports for your model based on where it thinks it needs to have one. We’ve found that Chitubox has been pretty accurate (80 – 90% accuracy) in predicting this. For the most part, we don’t need to include any additional supports manually once they have been generated.
However, feel free to include your own if you think it needs more support. Again, although Chitubox had been quite accurate for most of our 3D models, it may not be the same for you.
If you need to add more supports manually, simply click on the “Add Support” button in the lower right corner of the Print Supports menu.
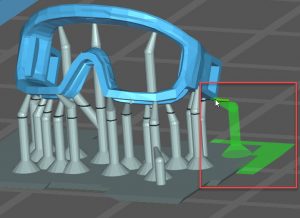
Press and hold the Right-Click button on your mouse to move the orientation and view of the print bed. Once you know the area you want to place the additional supports, simply hover over it and click on the left mouse button to set the support down.
While hovering over the area, you’ll notice that Chitubox is smart enough to let you know where the support will be placed. You can see this with the green silhouette, as shown below. It’s a nice feature to have because it lets you know ahead of time.
Once you’re happy with the supports, it’s time to slice the 3D model.
In the upper right corner of the Chitubox interface, click on the “Settings” tab.
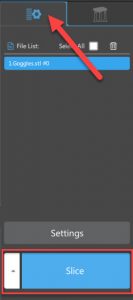
This will take us back to the original window of Chitubox when we first started. Then, click on Slice on the bottom right corner of the Settings window (make sure you selected the correct printer configuration).
This will slice the 3D model of the goggles, and we will be presented with the print details.
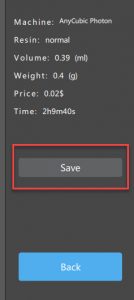
Verify all is good in the print details, and if you’re happy with it, click on SAVE. Chitubox will automatically save the necessary file to print the model into your 3D printer.
From here, all that is left to do is print the goggles. Load the file you saved earlier with Chitubox and press the print button on your 3D printer.
I will not go over the actual printing and post-processing of the model since I like to leave that part up to our readers. Some want to post-process and entirely paint them, while some prefer just the way it is after curing.
No matter what you choose to do, I hope you found this short guide helpful. I hope it cleared some things up a bit. Remember, you can print any shape or model, regardless of complexity and geometry. Print supports are there to help, but just make sure you place the supports on the least visible surface.
If you already 3D Print custom 1:12 scale accessories, and want to make some extra cash, I invite you to visit Dio Props 4 Hire. It’s a unique classified ads that caters to the miniatures and diorama community. Once you register for a FREE account, you can post ads to offer your talent and skills to the community. Ads are only $5.00 per post to any category, except for gigs. Ads posted to the gigs category are only $2.00 per post. You can’t beat the price!
A unique feature Dio Props 4 Hire has to offer is that it’s targeted for a very specific niche. Because of that, most (if not, all) of the visitors on the site will be a miniature/diorama enthusiast just like you.
In other words, it’ll be easier to sell what you have to offer because there’s an instant connection. People looking for someone to 3D Print them a custom 1/12 scale weapon for their GI JOE Classified figures are “intentionally” looking for that.
As a proud sponsor of Dio Props 4 Hire, I look forward seeing you there. If you have any questions or concerns, please send me a message here.
What other topics or tutorials would you like to see on the MAD blog? We welcome your feedback and would like to hear more from you. Send your requests here.